Below are excerpts and additions to an interview I did with Wellness for Makers. Because standing to throw and potter ergonomics are among the most frequently asked questions I receive, I wanted to have my answers in one place for easy reference and sharing.
And I do regularly update this content, including to add this one hour YouTube presentation demo I did about this PSA for the South Asian Clay Collective.
Happy, Healthy Potting, everyone!
“If I could give a lasting gift to all potters it would not be a wonderful glaze formula or a new tool. Instead I would give the gift of awareness about the wise use of our bodies.” ~ John Glick
Tell us about your background, and your first encounter with back pain.
I got my Associate’s degree from Montgomery College in Rockville, MD, my BFA from Alfred University, and MFA from Ohio University. I started having back problems while I was still an undergraduate. In most ceramics programs the students mix the clay, which involves lifting multiple fifty pound bags. At twenty-two, it never occurred to me to ask for help, nor that my body couldn’t handle mixing five hundred pounds of clay at a time and loading kilns with heavy shelves by myself. Cumulative lifting as well as throwing seated is what caused my back to “go out” which is the worst pain I’ve ever experienced in my life. It was probably a pinched sciatic nerve or slipped disc, but I never saw a specialist to confirm or treat it. I went to the school doctor and remember spending the next week or two in bed heavily medicated. My back continued to go out nearly once a year for the next ten, but I didn’t have health insurance to properly be diagnosed.
One of my professors encouraged me to do an internship with Greenfield Village pottery at the Henry Ford Museum outside of Detroit after I graduated. This was the first time I stood to throw (1995), which was mainly for visitor visibility, but it made a big difference for my back. Being in Michigan coincidentally put me in proximity to studio potter John Glick. He is well-known for his work, but also because his back issues almost ended his career. I worked with him for one year from 1996-97, and know if I hadn’t learned a healthy way to throw and other safe studio practices from John, I’d probably be doing something other than clay.

“To Sciatica and Back”, which includes a seven point Checklist for Longevity, should be required reading for anyone working in clay. Period. This was the first of two articles John wrote about back health for The Studio Potter journal, followed by “Down the Spinal Canal” which I also recommend.
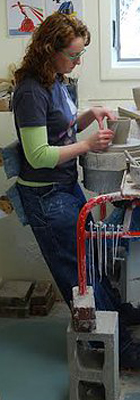
Can you talk more about standing to throw and your backrest?
My backrest is designed after the one John Glick pictured and wrote about in “To Sciatica and Back” (linked above, which I can’t emphasize enough to read. My comments here are simply further additions to his observations and experiences.). He had a woodshop attached to his ceramics studio to make tools and anything he needed, so it was very obvious for him to design something that could assist his throwing in a healthier way.
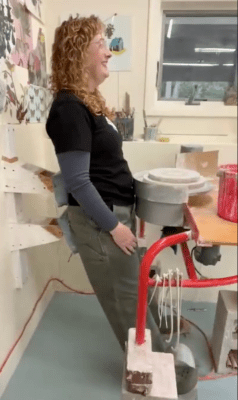
The backrest (my husband’s specs for mine below) provides support for both your back and bum allowing for leverage by pushing and leaning back against it, versus someone who is seated getting leverage from bending at the hips with their forearms and elbows on their thighs.
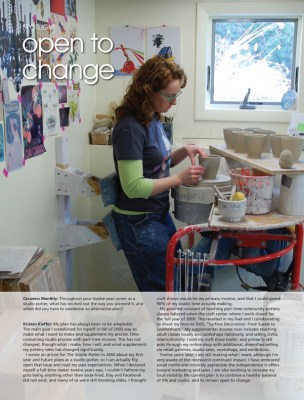
The wheel head should be belly button height at minimum. Mine is an inch higher. Too low and you’re back to the similar bent over position as being seated. Any wheel can be set up for the right height for any person. I use one cinder block and two bricks, for ex, under each leg for my height and have carted the same ones around to five studios in three states. Some wheel brands offer leg extensions, but they aren’t necessarily the correct height for good ergonomics to stand. I regularly see vids on social media of folks standing to throw with the wheel too low and no backrest. That is not a good ergonomics and could eventually lead to pain and problems the same as sitting.

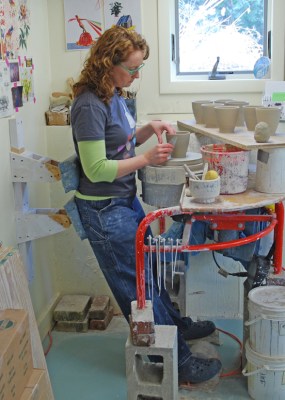
Pictured above (left) is the design and dimensions of my current backrest made by my husband and based on John’s. In use (right) and for comfort, I added upholstery foam wrapped and stapled with vinyl to the two plywood pieces that support my lower lumbar and bum.
Standing is fairly comfortable because you’re upright, working in front of your sternum rather than doubled over with your nose over the clay. The type of potter’s wheel can affect the set up a little bit; mine (a Soldner circa 1997) has more leg room underneath than others so is perfect for roomy standing. Because I prefer to change speed mid-throw if necessary and like to keep both hands on what I’m throwing, I keep my foot pedal on the floor. If the same foot is always on the pedal and the other foot is always flat on the floor —and particularly without the backrest— your hips are torqued and uneven, which can cause eventual pain to the hip and back. (When I teach away from my studio, the wheel is elevated to the correct height but without aid of my backrest I’m simply ‘free-standing’ and my back always feels uncomfortable at the end of the day. I know peers who have experienced long-term back and leg issues from years of ‘free-standing’ and not addressing the pedal placement.) John would shift the pedal to his other foot part way through the day to stay balanced. (I refer to him as being “ambifooted”.) I just have a wedge of wood underneath my left foot to mimic the position of my right on the pedal, so my hips are even and aligned. Some potters prefer having their pedal next to the wheel head and change speed by hand. So simply elevating the wheel or even leaning against a wall isn’t necessarily the answer to good back health.
And there isn’t one answer for everyone either. If you have feet or leg issues, altering the backrest design to allow a more seated or ‘perched’ position for your body might be a preferable solution. Everyone has different body issues and work needs, so make sure you find what is best for your situation. (Btw, John addresses throwing taller in his article.)
Do you teach this style of throwing to others?
I teach around five workshops nationally per year, and at a craft center locally during the school year and have added ‘conversations about ergonomics’ to my teaching. In both situations, I stand to throw and talk about why it’s beneficial. Most ceramic studios don’t have the room to elevate all the wheels, so almost everyone learns to throw sitting. Body health and safety are discussed much more now than they were twenty-five years ago, so it comes up readily when I teach. I always talk to my adult community students about being aware of their bodies and standing up often while they’re working. If they are not going to stand to throw, I encourage them to elevate the wheel so they are not completely bent over.


Can you talk about other precautions you’ve taken to keep your body healthy in the studio, and how standing to throw and other modifications have changed your work?
Wrist pain is second to back issues for a lot of potters. My first throwing instructor at Montgomery College had wrist surgery for ceramics related issues, so I learned to throw such that my wrists aren’t extended back. I keep them in line with my hands so I am not putting unnecessary, backwards pressure on my wrists when I throw (both pictured). Sitting to throw is bad enough, but some students also learn to tuck their elbows into their hips as leverage to center with bent wrists. This technique can cause the wrists to hyperextend and lead to injury, especially with larger amounts of clay.
One of my grad school professors also had wrist surgeries, primarily from wedging. He would wedge a couple hundred pounds of clay in the mornings to prepare for throwing, instead of wedging as he worked. He had wrist surgery twice on one wrist and then once on the other. Despite surgery, he continues to have tingling and pain issues in his hands.
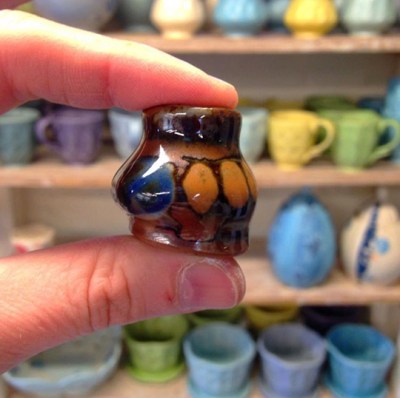
Other than throwing, wedging –while necessary to align particles– is the next worst activity for a thrower. Repetitive activity is what causes injury. In my studio, I regularly change what I’m doing, and refer to it as being “purposefully inefficient”. For example, if I am working on a series of thirty cups, rather than wedging thirty one-pound balls of clay all at once and then standing to throw thirty cups in one go, I wedge five or ten and then throw, and repeat. I also never slip-trail multiple cups in a row because that would put unnecessary strain on my thumb. Changing activities regularly prevents injury that can occur through repetition, like carpal tunnel syndrome and tennis elbow. Pottery is all about repeating, but we can break up the repetition.
Pain is NOT normal; it is NOT part of the process. Productivity is NOT the goal.
So back to the question, a lot of what I do to take care of my body I learned from being around people who have had injuries or as a result of my own discomfort. I have not changed my work, but I have changed the pace and flow of how I work. During my year-long internship at Greenfield Village I made two hundred pots a month, so I know how to efficiently make a lot work, but the efficiency that’s good for work flow is taxing on the body.
Do you practice stretching in your studio?
I don’t really stretch, but I do exercise. My husband who is a woodworker and powerlifter reminds me that strength training is great way of taking care of myself. Strengthening stomach and back muscles support your spine. Having stronger arms means that you don’t need to use your back as much when you are lifting heavy objects. We talk about exercise for being generally healthy, but it also gives us specific benefits in our work.

Do you have advice on how to make a studio more ergonomically correct?
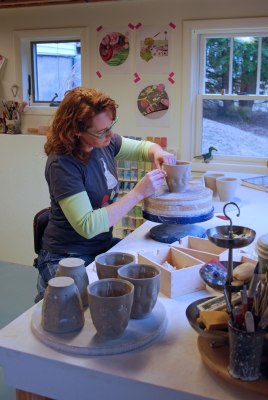
The main thing I would say is to be aware of your body. If it hurts, you need to figure out a different way of performing the activities that may be contributing to the pain. I always try to work so that I’m not hunched over. (I have friends with neck problems –even neck surgery– because they decorate in their lap or on a work surface that’s too low causing them to be curled over for long periods of time.) Table and work surface heights* are important. I have a banding wheel on my work table that is elevated and can be added to in height, so that no matter what size I’m working on, I can stay comfortably upright.
* My work table is the height of my hip bone, and my wedging table, which I also use to roll out slabs and rest work in progress is mid thigh height.

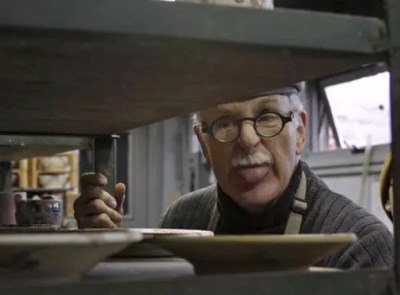
My studio is designed so that I can be fairly self-sufficient. One of my work tables and all of my glazes are on wheels so can be moved readily without unnecessary lifting. Glazing is my next back hurdle though. I have to bend over more than I would like while dipping and pouring glaze. Ideally, I would have a permanent glaze space like John such that the glaze buckets live on benches at a good ergonomic height (pictured), so I wouldn’t have to bend over, nor would they need to be lifted up and down during every glaze session. This setup requires more space than I currently have however.
The important elements of a healthy studio are being purposefully inefficient by regularly changing up your activities, and your equipment (backrest, table heights, an assistant, whatever accessories make your movements easier). It’s worth working a little more slowly to maintain a pain-free, healthy body.
Other thoughts on working healthy:
Read “To Sciatica and Back” in full. Share it, post it, print it out, and share it some more, online and in person.
- Stop thinking about changing how you work, and actually change it.
- If you groan after doing any activity (e.g. standing after sitting to throw), you need a change.
- Make a back rest, or hire someone to do it, if you’ve decided standing to throw would work for you. While better than sitting to throw, leaning against a wall or ‘free standing’ –especially if the wheel height is too low– are not truly ergonomic nor the same as using the backrest for stability and leverage.
- Check your hips. Standing or seated, it’s better if your hips are naturally facing forward and even (one side shouldn’t be higher or projected forward from the other). For both seated and standing throwing, you can place an object under the non-pedal foot to achieve this, alternate the pedal from one foot to the other, or place the pedal on the throwing deck and use your hand.
- Potters can place a mirror in front of themselves while throwing so they can look in the mirror rather than leaning over to see a pot’s silhouette.
- Using softer (vs. stiff) clay is better on your wrists for both wedging and throwing. If you’re fighting the clay, your body pays. It’s worth taking the time to soften a bag of clay.
- It’s difficult to change learned hand positioning (specific to throwing, but relevant to any part of the process), but if you’re experiencing discomfort and pain, try to change it. Think about your thumbs and wrists in particular. Years of doing “the claw” to throw has started taking a toll on my left thumb, so I’m following my own advice and re-training myself.
- Allow yourself to be Purposefully Inefficient. Don’t do the same activity for long periods.
- Keep your heart in mind. Whatever you’re working on should be around the height of your heart. That will keep you from curling over like a question mark saving your back and neck. If you can’t raise your work surface, try a shorter chair. As pictured above, I have bats that are 1″ thick I place on my banding wheel to change my work height. Sometimes I use no bats, and other times there are as many as 8-10 stacked on there.
- Exercise outside of the studio benefits you in the studio.
- Try not to hold things you’re working on if possible. If you can place the object on a banding wheel, that’s preferable. Holding your work –even at heart height– while decorating for example, strains your thumb, wrist, and neck.
Great ergonomic techniques by other artists:

Studio potter Kaitlyn Brennan invented the Brennan Pottery Clamp which allows pots (green or bisque) to be held safely in the clamp so the artist doesn’t need to, for decorating, handle application and more!
Pictured: Potter John R. Hamilton using the Brennan Clamp.
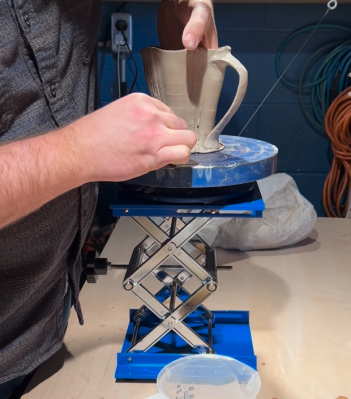
Studio potter Eric Ordway & Henrik Van Ryzin use a tabletop scissor lift to elevate in-progress pieces to a more comfortable working height. (Like how I stack my bats under my banding wheel, but way more elegant!)

Ceramic artist Kathy King, who does a lot of sgraffito decoration and has 2 herniated disks, has found sitting with her legs elevated in an Ikea POÄNG armchair with ottoman while decorating “takes the pressure off [her] lower back and neck. It is basically like being in a space capsule.”
Studio potter Matt Repsher created a rig that allows him to work ergonomically smarter, not harder! A Giffin grip attached to his Shimpo banding wheel atop a backstopped ‘T’ of wood tilts and elevated his work so he’s not hunched over.

Final Tidbits For A Healthy Studio:
- I tell students they should have dirty hands and clean jeans. Wiping wet clay on clothing creates dust when it dries. Breathing that on a daily basis is not healthy. I rinse my hands in my water bucket and use huck towels to wipe my hands, which I rinse out at the end of the day. Additionally and in part because my studio is in my home, I don’t let drips of clay or glaze dry on the floor to become dust I trek everywhere.
- Wear a respirator and put cartridges in it that are suitable for the particle size of your activity. One should be worn whenever working with dust (glaze-mixing, sanding, spraying…) Paper masks are not good enough.
- Don’t sand if you don’t have to. If you’re sanding greenware or bisqueware because the surface is rough for example, instead address burrs and inconsistencies on the leatherhard surface. Don’t create dust if you don’t need to.
- Wear eye protection for kiln peeping. I can’t believe how many Instagram pix I see of people staring into red hot kilns with bare eyeballs. You can greatly harm your retinas by looking into a hot kiln (gas, electric, or atmospheric). Welders glasses are stylish and safe.
- Wear eye protection for grinding. Even if you use a dremel tool to grind one lil’ blemish, protect your eyes. Whatever you’re taking off is going to fly somewhere, and you don’t want it to be in your eye.
- All of ceramics is practice so you might as well practice being safe and healthy too.
- Self-care isn’t a nice-to-have, it’s a need-to-have.

Again, I’d love for you to leave a comment with your suggestions and questions to add to the dialogue. Best wishes for healthy making now and into the distant future!